While your brows take up a small percentage of your face, they can truly make or break your look. No wonder why women today are stepping up their brow game, from going to professional eyebrow shaping salons to purchasing the best eyebrow makeup out there.

But here’s a friendly tip: you don’t have to waste your hard-earned cash on a professional eyebrow technician or makeup artist to get celebrity-inspired brows. You can perfect the job yourself, as long as you know these 5 core aspects: brow shape, face shape, brow hair color, the right tools, and the steps for your eyebrow makeup.
Ready to have a perfect set of eyebrows? Here are 5 steps to do it like a pro.
-
Table of Contents
Map out your brows
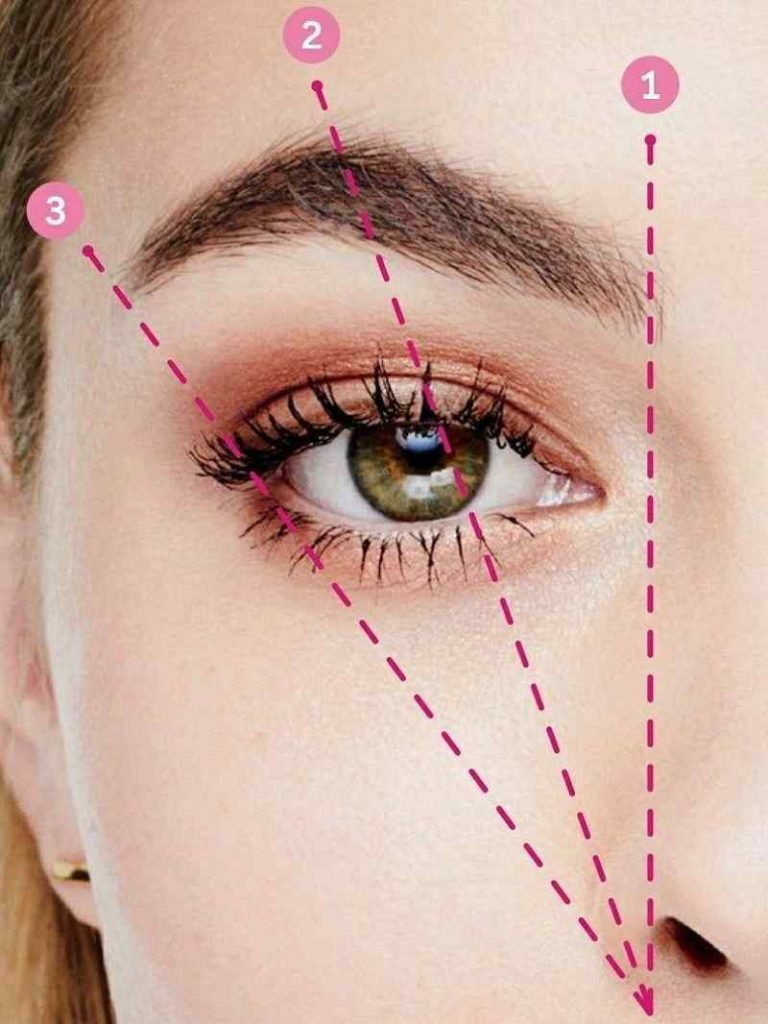
Before plucking the hair off and putting on makeup, make sure to locate the head and tail of your brow first.
-
Head (See Mark 1)
Take a pencil and place it vertically alongside the outer edge of the bottom of your nose. The golden rule is, the head of your eyebrow should be aligned with the outer edge of your nostril.
-
Tail (See Mark 3)
Holding the pencil, place it on an angle against your cheek, from the bottom of your nose to the outer corner of your eyes. That marks your eyebrow tail or end.
-
Arch (See Mark 2)
To determine where your arch lies, line the pencil diagonally, from your nostril to the center of your eyes. The arch should rise just above the outer rim of your iris and land right on your brow bone.
-
Shape your eyebrows to match your face shape
Not sure whether to go for angular brows or softer brows? For higher arches or lower arches? You may take cues from your face shape to find the best eyebrow shape for you.
- Round faces: Angular brow with a higher arch to define bone structure.
- Oval faces: Soft, slightly-arched brows to keep your face well-proportioned.
- Square faces: Soft brows with angled peak to complement the boxy look and soften your face.
- Heart-shaped faces: Soft, rounded arch to balance out harsh angles and sharp ends.
- For long/oblong faces: Straighter, elongated brows to balance out your vertically-stretched features.
If you’re unsure, you can always ask free expert advice from a professional eyebrow shaping salon.
-
Invest in basic tools
For the bare minimum, you need only four things: a tweezer, a brow pencil, a spoolie, and a brow gel. If you’re looking for full coverage, or if your brows need special attention, you may add a few products in your arsenal:
- Powder: Great for filling in brows with natural color.
- Pomade: For filling in sparse brow hairs.
- Angled brow brush: Designed for defining and filling brows with powder or pomade.
- Brow gel: For holding brows in place after you’ve finished filling them.
-
Find the right shade
The rule of thumb is, dark-haired folks should go for a shape that’s a bit lighter than their natural hair color. Light-haired people, on the other hand, should opt for a hue that’s a little darker than the color of their hair.
-
Start doing your brows
Now that you’ve mapped out your desired shape, chose your most flattering shade, and prepared the tools, let’s get working. For a perfect set of eyebrows, you need to remember these 7 steps:
- After you’ve mapped out the right shape and desired thickness, it’s time to tame the unwanted hair. Use a tweezer to pluck the stray hairs. Then, brush them up with a spoolie to see if there are long hair strands you need to trim.
- Use a lighter shade pencil to outline your brow’s natural shape. Use a light hand to line the lower and upper ends of your brows.
- Take out a flat, angled brush and your brow powder, then fill color in between the lines.
- Brush the hair up and away from the nose with a spoolie. This will blend in the color and set hairs in place. For a fade-in effect, brush the inner ends (head) of your brows with a spoolie to soften them.
- Using a small, flat angled brush, put a bit of concealer on the top and bottom of your eyebrows and blend. This will clean out the area and define your perfectly done eyebrows. Be extremely careful not to put concealer on your finished brows.
- You may also dab a bit of highlighter to emphasize the brow bone and make your eyebrows pop a little more.
- To make sure your eyebrow efforts won’t disappear that easily, use a brow gel or brow wax to lock hairs in place and help the color stay longer.